
From the early days of GUI design, developers were using drag and drop as an interface method in computing for things like file managers and web uploads. In our daily lives we pick things up, move them to where we want them, and set them down, making drag and drop an intuitive solution for UI design. Dragging and dropping can be used for any number of purposes in a video game. Sorting inventories, playing cards, solving puzzles, trading with NPCs, and crafting items are just a few examples of problems easily solved by a drag and drop interface. If you plan on developing a video game, odds are likely you’ll encounter a problem that can be solved with a drag and drop interface. Let’s dive into Godot’s native drag and drop implementation and compare it with some other, custom solutions to the problem.
Native drag and drop
Drag and drop is natively supported in Godot for any Control node and is managed through the implementation of specific overridable functions. You can specify drag and drop behavior by defining _get_drag_data(Vector2) for the draggable Control nodes and _can_drop_data(Vector2, Variant) and _drop_data(Vector2, Variant) on the nodes where items can be dropped.
_get_drag_data(Vector2) -> Variant
The get drag data function needs to be defined on a Control that is going to be draggable. The function should return data that is going to be used by the recipient control to determine where the selected control can be dropped. It’s passed the local coordinates with at_position. Inside this function, you may specify a Control node to display next to the cursor while the item is being dragged with a call to set_drag_preview(Control). As long as this method returns anything other than null, the item will become draggable. In my demo, I define the draggable card as follows:
class_name NativeDraggableCard extends Control

signal dragged_away(card: NativeDraggableCard)

enum NativeCardRank { ACE, ONE, TWO, THREE, FOUR, FIVE, SIX, SEVEN, EIGHT, NINE, TEN, JACK, QUEEN, KING }
enum NativeCardSuit { CLUB, DIAMOND, HEART, SPADE }

@export var card_source: NativeDroppableSlot.NativeCardSlotType = NativeDroppableSlot.NativeCardSlotType.DECK
@export var card_rank: NativeCardRank:
	set(value):
		card_rank = value
		update_card_value()
@export var card_suit: NativeCardSuit:
	set(value):
		card_suit = value
		update_card_value()

@onready var texture_rect: TextureRect = $TextureRect
@onready var card_face: Panel = $CardFace
@onready var value_label: Label = $CardFace/ValueLabel
@onready var sprite_2d: Sprite2D = $CardFace/Sprite2D

func _init() -> void:
	FpsOverlay.card_count += 1

func get_preview() -> Control:
	if card_face.visible:
		return card_face.duplicate()
	return texture_rect.duplicate()

func _get_drag_data(_at_position: Vector2) -> Variant:
	set_drag_preview(get_preview())
	return self

func randomize() -> void:
	card_rank = NativeCardRank.values().pick_random()
	card_suit = NativeCardSuit.values().pick_random()

func toggle_flip(show_face: bool) -> void:
	card_face.visible = show_face

func update_card_value() -> void:
	var card_rank_value: String = ["A", "1", "2", "3", "4", "5", "6", "7", "8", "9", "10", "J", "Q", "K"][card_rank]
	value_label.text = "%s" % card_rank_value
	value_label.modulate = Color.RED if card_suit == 1 or card_suit == 2 else Color.BLACK
	sprite_2d.frame = card_suit
	# offset sprites due to extra border around image
	sprite_2d.offset.y = -64 if card_suit < 2 else 0
This sets the preview Control to be a duplicate of the card face (or back, if the card isn’t flipped over yet). Then, the function returns the card node, itself. The output of this function is used as the second argument for both _can_drop_data(Vector2, Variant) and _drop_data(Vector2, Variant). There isn’t much here to explain about the _get_drag_data(Vector2), but we’ll go into depth about what the output of this function is used for in the next 2 sections.
_can_drop_data(Vector2, Variant) -> bool
This function needs to be defined within the Control node that can receive the dropped item. This function has 2 parameters: at_position is the local coordinates of where the item to be dropped is being tested and data is whatever is returned from _get_drag_data(Vector2) of the node being dragged.
The output of this function is a boolean that indicates whether the item can be dropped on this node or not. I configured the droppable slots in the demo as:
class_name NativeDroppableSlot extends PanelContainer

enum NativeCardSlotType { DECK, HAND, DISCARD }
@export var slot_type: NativeCardSlotType

func dragged_away(card: NativeDraggableCard) -> void:
	card.dragged_away.disconnect(dragged_away)
	remove_child(card)

func add_card(card: NativeDraggableCard) -> void:
	card.dragged_away.connect(dragged_away)
	add_child(card)

func _can_drop_data(_at_position: Vector2, data: Variant) -> bool:
	if data is NativeDraggableCard:
		match (data as NativeDraggableCard).card_source:
			NativeCardSlotType.DECK:
				return slot_type != NativeCardSlotType.DISCARD
			NativeCardSlotType.HAND:
				return slot_type != NativeCardSlotType.DECK
			NativeCardSlotType.DISCARD:
				return false
	return false

func _drop_data(_at_position: Vector2, data: Variant) -> void:
	var card: NativeDraggableCard = data as NativeDraggableCard
	card.dragged_away.emit(card)
	card.card_source = slot_type
	add_card(card)
Using the passed in data, I can check where it’s being dragged from and make sure the cards aren’t being moved illegally (I’m only allowing deck to hand, hand to hand, and hand to discard). In addition to that, I’m also registering a signal to know when the card is moved, since the drag and drop system only notifies the node it’s being dragged on top of.
_drop_data(Vector2, Variant) -> void
This function is responsible for handling the logic that occurs when a successful drag and drop interaction is completed. It’s passed the location of the node to be dropped and the data returned by the droppable node’s _get_drag_data() function. In my function, I’m adding the node to the destination slot and emitting a signal so the source slot can remove the node from its list of children.
Button-based drag and drop
The first custom solution we’ll cover is actually one that hadn’t even occurred to me, initially. It was suggested to me by a fellow Godot dev who didn’t know if the engine had a native implementation. And it even makes a great deal of sense to look to buttons as a solution that involves minimal amounts of custom code. Buttons already handle mouse events, so that gets you halfway there, right? Well, as with all good answers to complex questions, it’s complicated. Another thought might be concern for accessibility. You might think it difficult to accommodate things like touchscreens, for example. While accessibility is very important, especially with the prevalence of smartphones, this is not a feature you really need to concern yourself with implementing manually, as we’ll see later.
Modifying the cards
The first place I started was with modifying the cards themselves. With this system being button-based, the obvious change to begin with was adding a button node to the card, making sure the button was on top of all the other nodes, expanded to the full dimensions of the card, and styled to not be visible. This last attribute was probably the trickiest, because you can’t simply use the visible property on the button. The visible property does effectively hide the button, but it also makes it so that the button ignores all mouse interactions when it’s not visible. We needed to find a solution that made the button not visible, while still allowing mouse events to register with the button node. There might be several ways to go about this, but I eventually went with setting the alpha channel of the self_modulate property to 0.
Note: There may be other ways to achieve this, but this is the route I went. You might find success with using a texture button with no texture provided or any other number of button based alternatives.
Modulate and self-modulate
The properties modulate and self-modulate exist on any node that inherits from the CanvasItem class. These properties serve similar, yet distinctly different functions. The modulate property allows you to specify a color to apply to this node and all children. This is applied similarly to a colored filter over the node. The self-modulate property also applies a color to a node, but does not apply the color to children nodes.
The first change I made to the card script was removing _get_drag_data(Vector2). I then added the following functions:
...

func _on_button_button_down() -> void:
	mouse_offset = get_local_mouse_position()
	dragged_from_pos = global_position
	z_index += 1
	is_being_dragged = true

func _on_button_button_up() -> void:
	ButtonEventBus.card_dropped.emit(self)
	z_index -= 1
	is_being_dragged = false

func revert_pos() -> void:
	move_to_pos(dragged_from_pos)

func tween_pos_done() -> void:
	z_index -= 1

func can_move_to_slot(slot: ButtonDroppableSlot) -> bool:
	match slot.slot_type:
		ButtonDroppableSlot.ButtonCardSlotType.DECK:
			return false
		ButtonDroppableSlot.ButtonCardSlotType.HAND:
			return slot.get_child_count() == 0 and card_source != ButtonDroppableSlot.ButtonCardSlotType.DISCARD
		ButtonDroppableSlot.ButtonCardSlotType.DISCARD:
			return card_source == ButtonDroppableSlot.ButtonCardSlotType.HAND
	return false

func move_to_pos(pos: Vector2) -> void:
	z_index += 1
	var tween: Tween = get_tree().create_tween()
	tween.set_ease(Tween.EASE_IN_OUT)
	tween.tween_property(self, "global_position", pos, TWEEN_TIME)
	tween.tween_callback(tween_pos_done)

func move_to_slot(slot: ButtonDroppableSlot) -> void:
	var old_pos: Vector2 = global_position
	dragged_away.emit(self)
	card_source = slot.slot_type
	toggle_flip(slot.slot_type != ButtonDroppableSlot.ButtonCardSlotType.DECK)
	slot.add_card(self)
	set_deferred("global_position", old_pos)
	call_deferred("move_to_pos", slot.global_position)
Notably, there is a fair amount of code being added and very little code being removed. This is also not exactly a one-to-one comparison. This implementation is far more customizable and furthermore, some of the logic from the droppable slot was moved to the card script. Covering just a brief overview of the code I added, are the following functions:
_on_button_button_down() and _on_button_button_up()
These two functions are bound to the button_down and button_up signals, respectively. They manage the logic that runs when the user begins and finishes dragging the mouse. These functions aren’t doing anything wildly complex, the drag state is just a boolean, the card keeps track of where the mouse picks it up from, and what the mouse offset is when it’s picked up. There is also logic managing the z-index so that dragged cards visually appear in front of everything else.
revert_pos() and tween_pos_done()
These two functions were all designed to manage the animation for moving the card back to the slot it was dragged from in the case it gets dropped in an invalid location.
can_move_to_slot(ButtonDroppableSlot) -> bool
This logic was moved from a function in the droppable slot class (_can_drop_data(Vector2, Variant) -> bool) and handles all the logic of determining if the card is able to relocate to the slot it was dropped on top of.
move_to_pos(Vector2) -> void
This function animates the card’s position from its current position to a provided target position. This wasn’t strictly necessary, but I found the animation both a pleasing visual update to increase overall polish and a great example of the types of customizations this sort of custom dragging implementation opens the door to.
move_to_slot(ButtonDroppableSlot) -> void
This function was in charge of managing everything that happened when a card was moved to a new slot, which was handled by the slot in the native implementation (via the code inside of the _drop_data(Vector2, Variant) function). It updates the card’s properties, moves the actual node in the scene tree from the old to the new parent slot, and then animates the card’s position to align perfectly with the slot’s position.
Mouse event-based drag and drop
The second custom system I implemented (and the one I originally thought up) was based on the premise that all nodes that inherit from Control emit a signal when the node receives any sort of input event. This allowed me to repurpose all the code from the button-based solution with one simple addition.
_on_gui_input(InputEvent) -> void
Inside this function, which is bound to the signal gui_input on the root Control node of the card, I’m checking for one of two different event types: InputEventMouseButton and InputEventMouseMotion.
If it is an InputEventMouseButton event, then I check if the button_index, a property that tells you which button triggered the event, is 1 (the left mouse button). If it is, then I check the value of button_mask, a bitwise flag property that tells you which buttons are currently being pressed. If the value is 1 (only the left mouse button is pressed), then I call the previously signal-bound _on_mouse_button_down(), otherwise I call the previously signal-bound _on_mouse_button_up().
If the event is of type InputEventMouseMotion and the boolean flag is_being_dragged is true, then I update the position of the card so that it visually moves along with the mouse while being dragged.
Drag and Drop Demonstration
Controls
- ↑ – Add 100 cards to scene
- Esc – Exit to main menu
What’s the breakdown?
There are a few categories that I want to cover when comparing and contrasting these different solutions. If you’re just here to find out which is better: it depends, but they’re largely comparable. Let’s break down the pros and cons by topic.
Performance
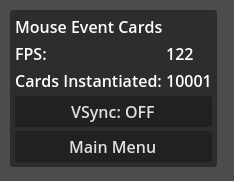
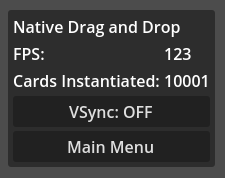
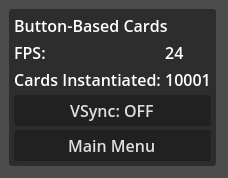
Engine performance wasn’t nearly as significantly different as I expected. Natively on Windows, I loaded up the basic scene and loaded in 10,000 cards. Both native and mouse event sat at around 120fps, whereas button based cards had dropped to 24fps. I then loaded up a browser build and the difference started to grow. In a web build the native and mouse event solutions were still locked in at 60fps (I think VSync is locked on in web builds), but the button based solution had dropped down to 5fps with only 5000 cards loaded. In the web build, the button solution dropped below 60fps when there were only 300 card nodes loaded. So from a raw numbers perspective, it looks like the button based drag and drop is far worse than the other two. But when you really think about it, 300 drag and drop nodes on a single screen isn’t a realistic situation. That being said, it can still have an impact on the overall performance of your game.
One final caveat I did want to mention, this is obviously a far from perfect benchmark. This is just measuring FPS under a static load. It is notable that in each “benchmark” I noticed significant frame drops anytime I so much as moved my mouse, let alone interacted with the UI. These benchmarks were also not very realistic scenarios and I will admit they weren’t even under very controlled conditions. I didn’t close down all programs when I was running it. So take these numbers with a massive grain of salt.
Complexity
From a complexity standpoint, they were all fairly simple to implement. Obviously this is an extremely subjective experience, but I didn’t encounter any prohibitively convoluted code with any of these solutions. That being said, if I had to rank them in terms of complexity, I’d say the native implementation wasn’t exactly intuitive nor did I find great documentation or tutorials about setting it up. Both buttons and mouse events used essentially the same code, in my opinion, only differing when it comes to how each registers events.
Customizability
As far as comparing how each solution fares from a customization perspective, again the native implementation here suffers since using strictly the pre-supplied functions, you have a hard boundary around the capabilities of the system. That being said, any of the features achieved in the custom solutions can be added to the native system, but at that point, you’re working with a custom system now and it’s not exactly a fair comparison. From the perspective of the other two implementations, since you’re in charge of maintaining and triggering all the relevant events, you have complete control over the full system, with the ability to hook in any sort of additional features as you see fit.
So, which solution is the “right” solution?
If it wasn’t obvious, there’s no “best” solution. But I did learn a lot along the way. Personally, I think I might use the mouse event implementation more often than not, but each option can have certain scenarios where it shines.
The native solution is guaranteed to work out of the box, and probably can be optimized far more than I had it. There may even be additional features I missed in the documentation, but I looked it over several times and don’t think I missed anything. There’s also the potential for the native implementation expanding in functionality down the line with future releases.
The button solution’s main appeal is that, to some people, it may seem the most intuitive. Most of the drag and drop code lives in preexisting signals. Especially if you’re comfortable with Godot, this solution in particular follows a lot of patterns you’ll be familiar with.
The mouse event solution might be my personal favorite. It performed about just as well as the native implementation and did so with a more polished look, in my opinion. I may also be a tad biased, because I’m particularly proud of my solution, so keep that in mind.
GET IN THE COMMENTS!
Did you know about Godot’s native drag and drop implementation?
Are there any other drag and drop solutions you’ve previously used?
What would you like me to write about next?
This post was really cool. I referenced the drag and drop Github page you shared a while back when starting up my deckbuilder project. I’ve ended up adapting my system based on the mouse event system you shared.
I’d be interested in seeing an article on clever use of animation players! Or tool scripts! Or viewports! That’s my .02
This was very helpful. I had been implementing drag and drop via the native solution and I wasn’t happy with how it looked (including how the mouse cursor changed) among other things. The button based solution is fine for my project as I will have at most 20 draggable objects at one time.
Every word you’ve written feels like it carries a lifetime of wisdom. There’s a clarity to your thoughts and a depth to your reflections that is rare in today’s world. Your writing isn’t just meant to be read — it’s meant to be savored, to be thought about, and to be shared with others who will appreciate its quiet beauty.